

By Gaurav Sharma
Fact-Checked & Updated: September 2026 | Reviewed against guidance from the National Institute on Aging (NIA) and NCCIH
Staying active after 60 shouldn’t feel like a chore, and it definitely shouldn’t require getting down onto a hard floor. Practicing chair yoga exercises for seniors is one of the simplest, safest ways to loosen tight joints, rebuild balance, and keep moving comfortably right from the living room.
For many of us, traditional workouts can be tough on sensitive knees or hips. By using an ordinary household chair for steady support, you take the pressure off your body while still giving your muscles and spine the gentle movement they need each day.
A quick safety reminder before we begin: gentle movement should always feel good, not painful. Take things at your own pace, stay within a comfortable range of motion, and check in with your doctor or physical therapist if you are managing a recent injury, joint surgery, or chronic health condition.
What Is Chair Yoga?
Chair yoga is simply traditional stretching and movement adapted for a seated position or done while holding onto the back of a sturdy chair for support.
It takes the heavy pressure off your knees, hips, and wrists. For older adults, it’s an easy, low-barrier way to maintain flexibility and keep circulation moving without buying fancy equipment or joining a gym.
Guidance from the National Institute on Aging (NIA) and the National Center for Complementary and Integrative Health (NCCIH) consistently emphasizes that low-impact, modified movements help older adults preserve their everyday independence and reduce fall risks.
Why Chair Yoga Works Well for Older Adults
- Eases Morning Joint Stiffness: Moving your arms, neck, and legs gently through comfortable positions helps keep joints from locking up.
- Supports Everyday Posture: Simple seated alignment exercises strengthen the core and back muscles that keep you standing and sitting tall.
- Helps Prevent Stumbles: Better ankle mobility and leg control make it easier to keep your footing on uneven surfaces.
- Calms the Mind: Pairing slow, easy stretches with natural breathing reduces tension and helps you relax.
- No Special Setup Needed: A sturdy dining chair and 15 minutes in your living room are all you need.
Setting Up Safely Before You Start
- The Right Chair: Pick a plain, solid chair without wheels, swivel mechanisms, or wide armrests that get in the way. A basic wooden kitchen or dining chair works best. Place it on a flat, non-slip floor.
- Breathe Naturally: Never hold your breath. Inhale smoothly through your nose and let the air out naturally through your nose or mouth.
- Listen to Your Body: A gentle pulling feeling in a muscle is fine. Sharp pain, numbness, or pinching in a joint is your cue to stop immediately.
- Keep Water Close By: Have a glass of water nearby to sip during or after your routine.
📖 ALSO READ:SilverSneakers Locations 2026: Find Free Medicare Gyms Near You
The 10 Safe Chair Yoga Exercises for Seniors
Go through these 10 exercises in order. Take your time, don’t rush between movements, and aim for a relaxed 15 to 20 minutes.
1. Seated Mountain Pose (Tadasana)
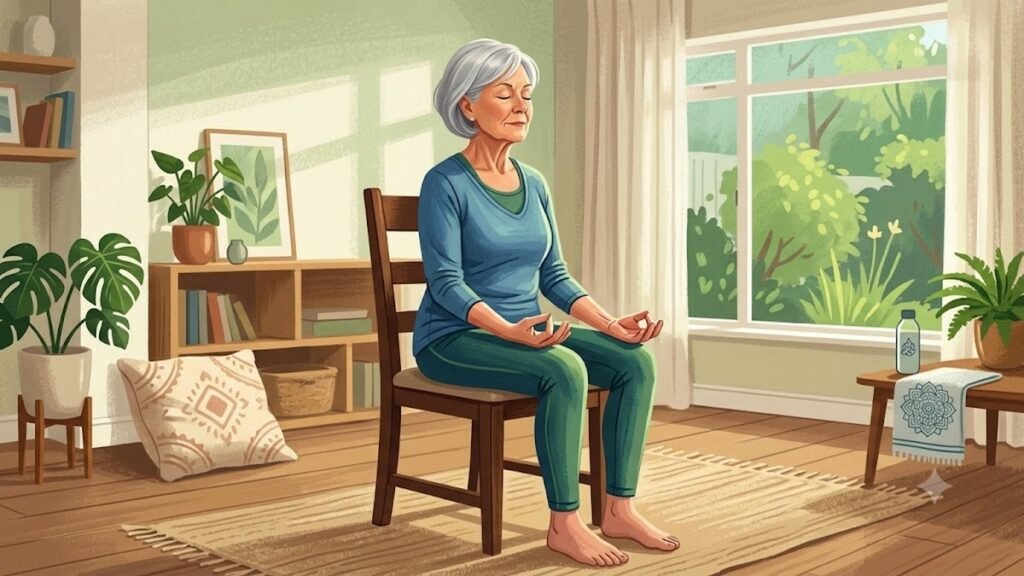
What it does: Helps reset your posture, opens your chest, and settles your breathing.
How to do it:
- Sit upright toward the front half of your chair with both feet flat on the floor, about hip-width apart.
- Sit tall through your spine without forcing your back stiff. Roll your shoulders up, back, and let them drop down comfortably.
- Rest your palms flat on your thighs.
- Look straight ahead, keeping your chin level.
- Take 5 slow, calm breaths, feeling your feet firmly planted on the floor.
2. Seated Cat-Cow Stretch (Marjaryasana-Bitilasana)
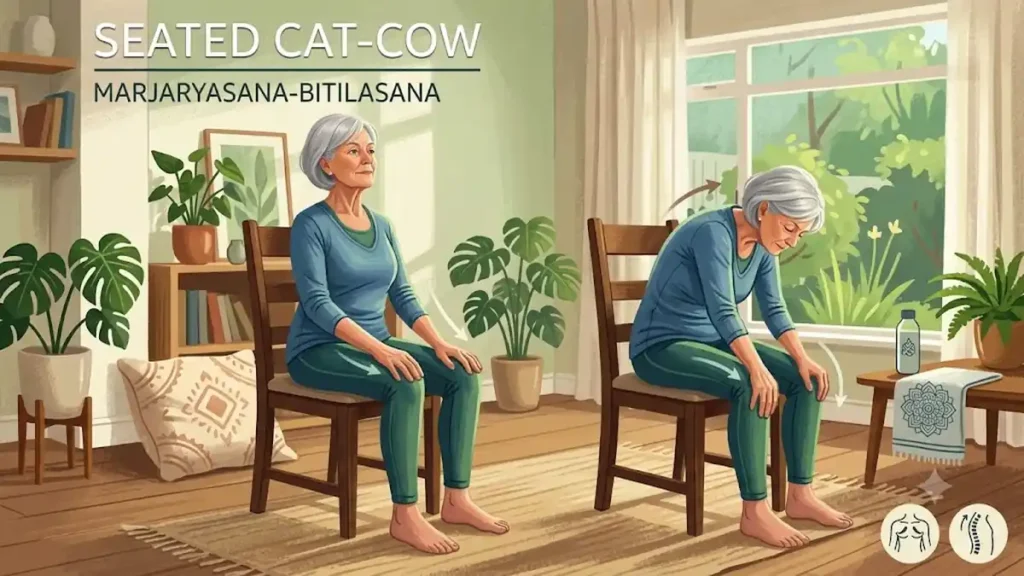
What it does: Gently mobilizes the spine and eases stiffness in the upper and middle back.
How to do it:
- Start in your upright seated position with your hands resting on your knees.
- The Open Stretch (Cow): Inhale, gently draw your chest forward, and look slightly upward. Let your lower back arch naturally.
- The Rounded Stretch (Cat): Exhale, slowly round your upper back, let your head nod gently forward, and pull your belly slightly in.
- Flow smoothly between these two shapes 5 or 6 times, matching the movement to your breath.
3. Seated Side Body Stretch
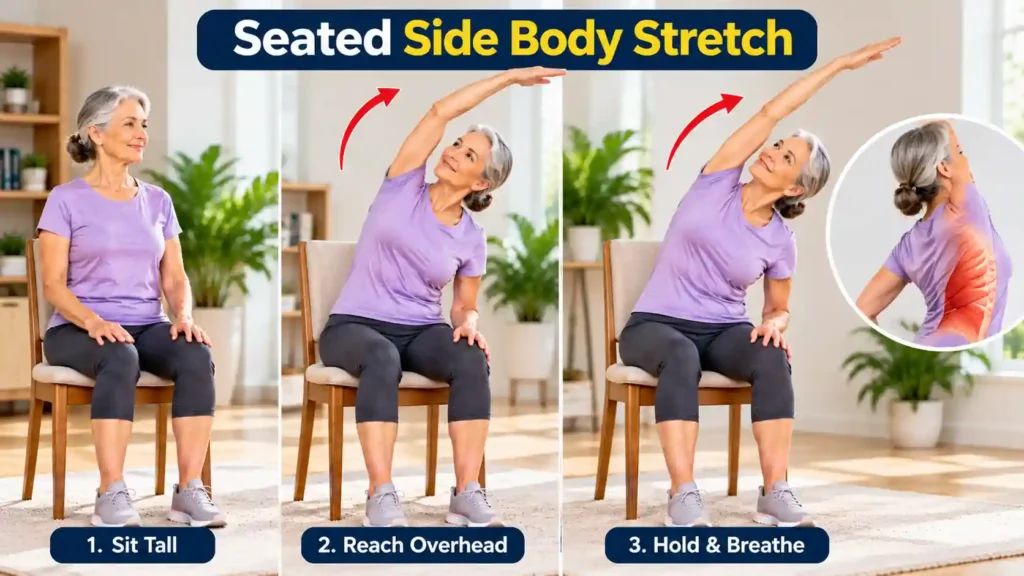
What it does: Opens up the sides of your rib cage and helps make breathing feel easier.
How to do it:
- Sit tall with both feet flat on the ground.
- Hold onto the side of the chair seat with your left hand for stability.
- Inhale and raise your right arm straight up toward the ceiling (raise it only as high as your shoulder comfortably allows).
- Exhale and lean slightly to the left, feeling a gentle stretch along your right ribs. Keep both hips planted on the chair.
- Hold for 2 to 3 breaths, come back to center, and repeat on the other side.
4. Seated Forward Hinge (Uttanasana Modification)
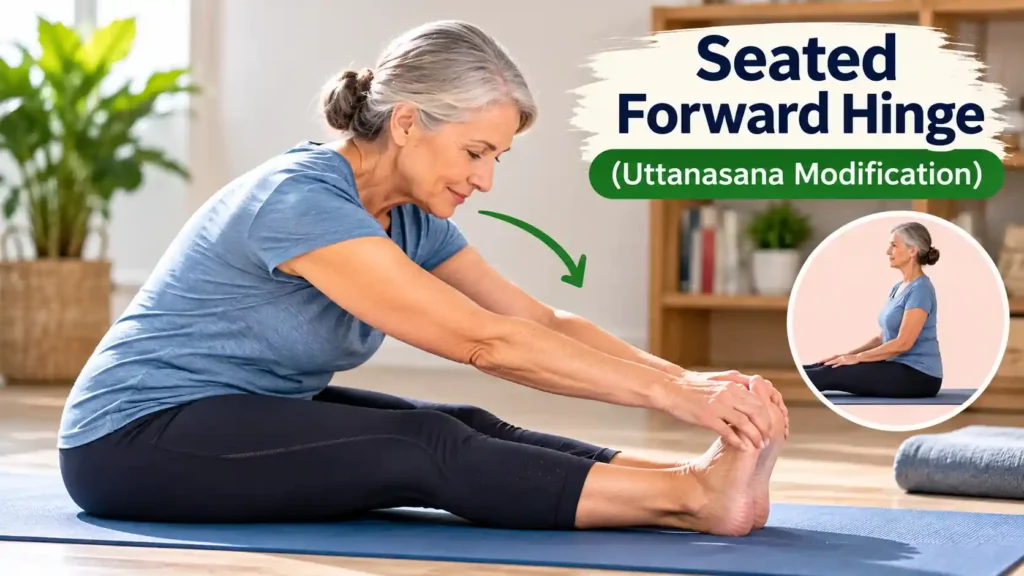
What it does: Stretches the lower back and hamstrings without forcing your head toward the floor.
How to do it:
- Sit with your feet slightly wider than your hips for a solid, wide base.
- Rest your hands or your forearms firmly on your thighs for support.
- Keeping your chest open and your back straight, slowly lean your upper body forward from your hips.
- Only go as far as feels comfortable. Avoid rounding your neck or dropping your head low if you ever feel lightheaded.
- Hold for 3 to 4 easy breaths, then press through your hands to sit back up.
5. Seated Spinal Twist (Ardha Matsyendrasana)
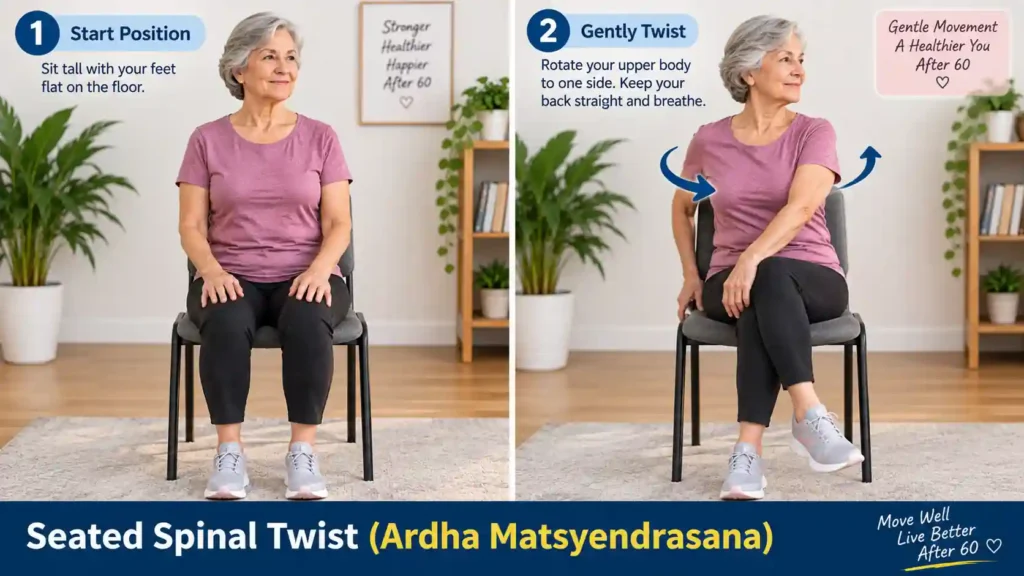
What it does: Keeps your mid-section and back moving freely for everyday tasks like turning around in the car or looking over your shoulder.
How to do it:
- Sit tall with your feet flat on the floor.
- Take a breath in to lengthen your back. As you exhale, gently turn your upper body toward the right.
- Place your left hand on the outside of your right knee, and rest your right hand on the side of the chair.
- Keep your shoulders down and look only as far to the right as your neck naturally wants to go.
- Hold for 3 to 4 calm breaths, untwist slowly, and switch to the left side.
6. Seated Leg Extensions
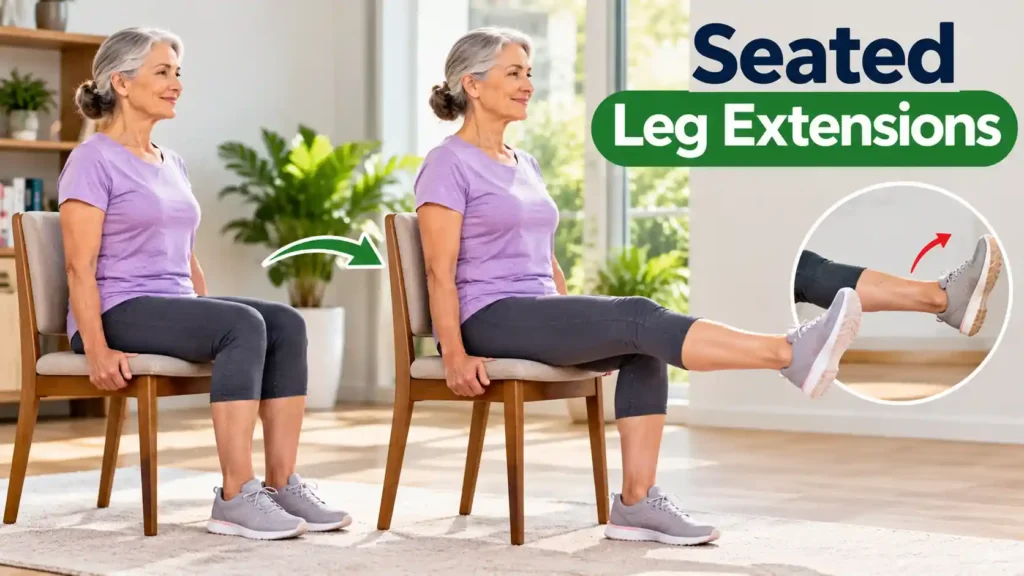
What it does: Wakes up the thigh muscles (quadriceps) and helps support your knee joints for easier walking.
How to do it:
- Sit back against the chair so your lower back is supported.
- Inhale and slowly lift your right foot, straightening your leg out in front of you. Keep your toes pointing up toward the ceiling. (Do not snap or lock your knee).
- Hold it there for 2 to 3 seconds until you feel your thigh working.
- Exhale and lower your foot slowly back down.
- Do 5 slow lifts on the right leg, then repeat 5 on the left.
7. Seated Ankle Circles & Heel-Toe Rocking
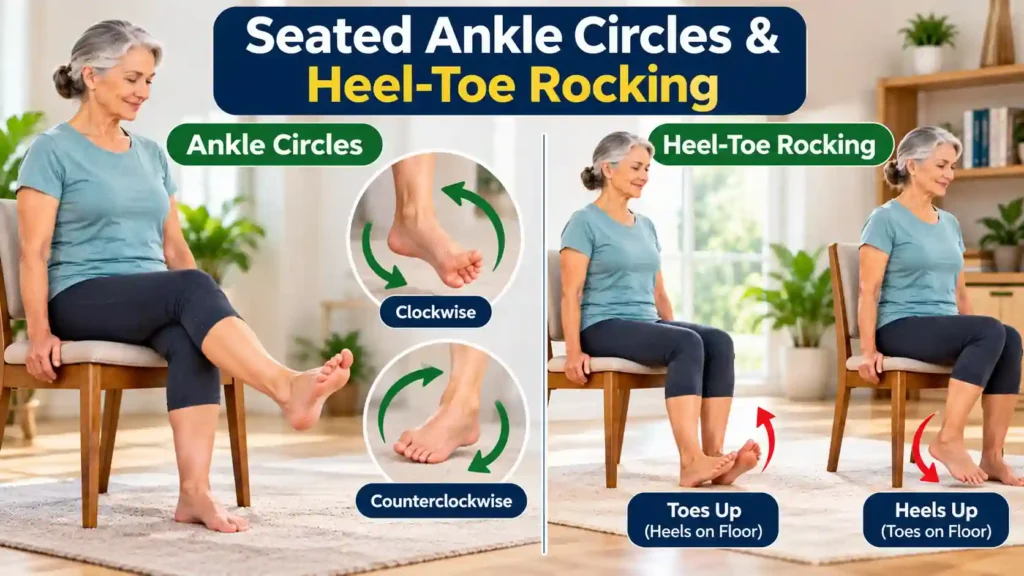
What it does: Loosens up the ankles, gets blood circulating in the lower legs, and supports steady foot placement.
How to do it:
- Lift your right foot a couple of inches off the floor.
- Slowly draw circles with your big toe: 5 times in one direction, then 5 times the other way. Put the foot down and repeat on the left side.
- Place both feet flat on the floor.
- Lift both heels as high as comfortable while keeping your toes down, then lower them.
- Next, lift your toes while keeping your heels pressed down. Rock smoothly between heels and toes 8 to 10 times.
8. Seated Figure-Four Stretch / Chair Pigeon (Eka Pada Rajakapotasana)
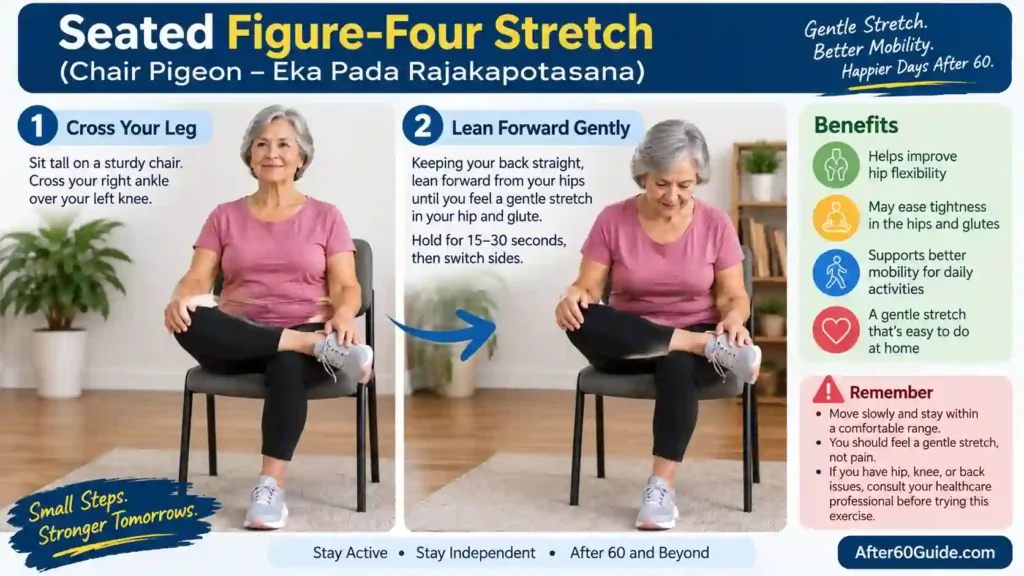
What it does: Releases tight hips, outer thighs, and the lower back—especially helpful after sitting for long periods.
How to do it:
- Sit upright on your chair with feet flat.
- Lift your right leg and rest your right ankle across your left knee, creating the shape of a figure “4”. (If bringing your ankle to your knee is too tight, simply cross your right ankle over your left ankle on the floor).
- Keep your right foot flexed to protect your knee.
- Sit tall. If you want a bit more stretch, lean slightly forward from your hips with a flat back.
- Hold for 3 to 4 slow breaths, uncross gently, and repeat on the other side.
9. Seated Shoulder Rolls & Chest Opener
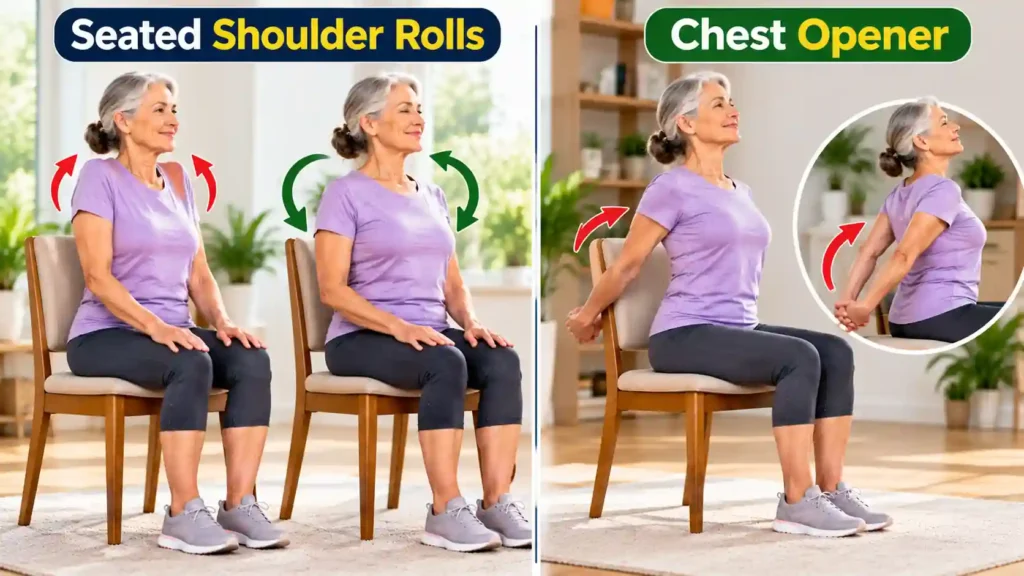
What it does: Eases tightness across the neck and upper shoulders from reading, typing, or slouching.
How to do it:
- Sit tall with your arms resting loosely by your sides.
- Shrug your shoulders up toward your ears, roll them backward in a wide circle, and let them drop down.
- Do 5 slow backward rolls, then reverse and do 3 gentle forward rolls.
- Finish by holding onto the sides of your chair seat and gently pulling your chest forward to open up your collarbones for 3 deep breaths.
10. Seated Final Relaxation (Chair Savasana)
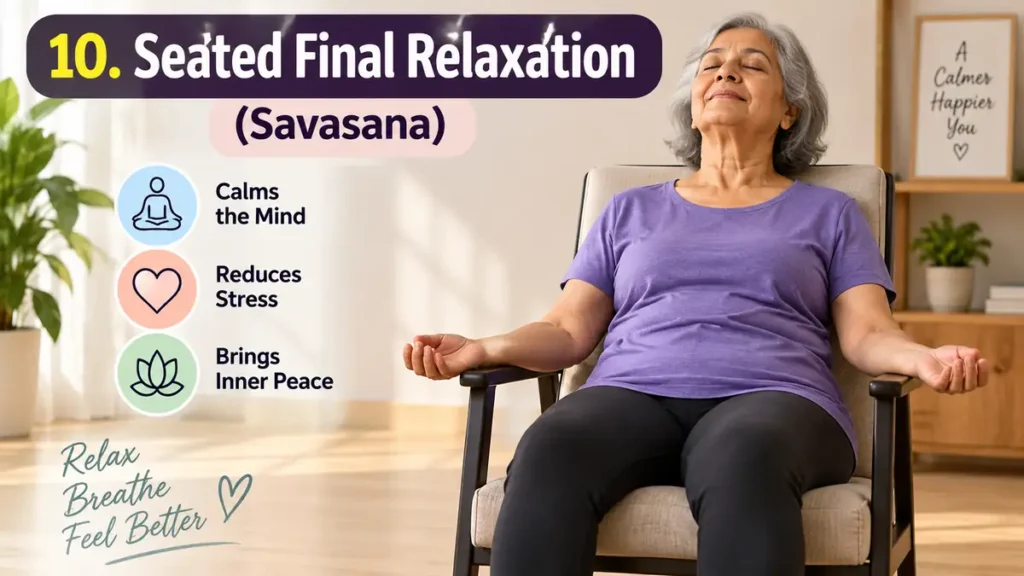
What it does: Lets your muscles soften, brings your heart rate to resting pace, and closes out your practice calmly.
How to do it:
- Slide your hips all the way back against the chair so your back is fully supported.
- Keep your feet resting flat and uncrossed on the floor.
- Rest your hands loosely in your lap with your palms facing up, and drop your shoulders completely.
- Close your eyes or simply look down at the floor with a soft gaze.
- Stop thinking about the exercises. Just breathe naturally for 2 to 3 minutes, letting your body completely unwind before you stand up.
📖 ALSO READ: 7 Easy Exercises for Seniors: Simple Ways to Stay Active at Home
Frequently Asked Questions
How often should older adults do chair yoga?
Practicing for 15 to 20 minutes, 3 or 4 days a week is a great rhythm. Consistency matters far more than doing a long session once in a while.
Can chair yoga help with arthritis?
Yes. Guidance from the National Institute on Aging (NIA) notes that regular, low-impact activity helps maintain joint mobility and reduces morning stiffness by encouraging natural movement. Just remember to always stay within a comfortable range—never force a joint that feels tender or swollen.
Is chair yoga safe after a knee or hip replacement?
It can be, but you have to be cautious with certain angles. For example, crossing your legs in the Figure-Four stretch or bending forward deeply can violate medical movement precautions after a replacement. Always check with your orthopedic surgeon or physical therapist before trying hip stretches.
When should I stop an exercise immediately?
Stop what you are doing and consult a healthcare provider if you notice:
- Any tightness, heaviness, or pain in your chest
- Sudden dizziness or feeling faint
- Sharp, shooting nerve pain down your legs or arms
- Unusual shortness of breath
Sources & Further Reading
- National Center for Complementary and Integrative Health (NCCIH) — Yoga: Effectiveness and Safety
- National Institute on Aging (NIA) — Exercise and Physical Activity
- Centers for Disease Control and Prevention (CDC) — Physical Activity for Older Adults
Medical Disclaimer: This article is for general educational and informational purposes only. It does not provide personalized medical advice, diagnosis, or treatment. Exercise recommendations may not be appropriate for everyone. Speak with a qualified healthcare professional before beginning a new exercise routine, particularly if you have a medical condition, injury, recent surgery, or concerns about your ability to exercise safely.
Start with 5 gentle chair yoga poses if you want a shorter session.
Educational only — not medical, legal, or financial advice. Talk to a qualified professional before changing exercise, diet, medication, or making a major purchase. After60Guide is not a medical practice.



Gaurav Sharma is the founder and lead writer of After60Guide. He writes practical, source-cited guides on movement, nutrition, home safety, and everyday living after 60. He is not a doctor, physical therapist, or financial adviser. Health and money articles are general education, checked against official public sources where relevant — not personal advice. Corrections: contact@after60guide.com